
Home
Interfacing SPI ST7735S TFT LCD (0.96 inch 80×160 RGB) with NodeMCU v1.0
Interfacing ST7735S to ESP8266 NodeMCU v1.0 to display text on this TFT LCD (0.96 inch 80×160 RGB IPS) took me about 3-4 hours to piece the puzzle together, but it worked out well. Enjoyed playing with MCU after a decade.
How do you set it up?
NodeMCU v1.0 Pin Configuration:
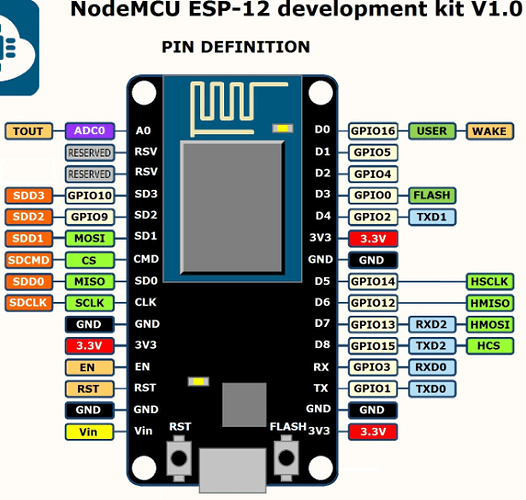
NodeMCU to ST7735S Pin connection:
// Display GND to NodeMCU pin GND (0V)
// Display VCC to NodeMCU 5V or 3.3V
// Display BLK to NodeMCU pin VIN
// Display TFT_CS PIN to D8 // Chip select control pin D8
// Display SDI/SDA/MOSI to NodeMCU pin D7
// Display TFT_DC PIN to D6 // Data Command control pin
// Display SCK/SCL to NodeMCU pin D5
// Display RES or TFT_RST to D4 // Reset pin (could connect to NodeMCU RST, see next line)
TFT Library:
I couldn’t make Adafruit’s library work for me. Instead, I used Bodmer’s TFT library and updated the header file (User_Setup_Select.h) and (User_Select.h) as per the documentation.
Bodmer’s TFT_eSPI library:
https://github.com/Bodmer/TFT_eSPI
Library folder location:
C:\Users\<user-name>\Documents\Arduino\libraries\TFT_eSPI
I have used Bodmer’s TFT_eSPI library with a customized User_Setup file to work with the ESP8266 and ST7735S display controller. You need to copy the C:\Users\<user-name>\Documents\Arduino\libraries\TFT_eSPI\User_Setups\Setup43_ST7735.h header file’s content to User_Setup.h on folder C:\Users\<user-name>\Documents\Arduino\libraries\TFT_eSPI
TFT_eSPI offers excellent support for this display. The library follows its own conventions: instead of defining the display directly in the Arduino sketch, the sketch universally includes the TFT_eSPI.h library. TFT_eSPI then checks whether an external User_Setup_Select.h file contains a reference to a user-modified setup file that matches the microcontroller and display being used. Essentially, the equivalent of a constructor (used in other scripts to define the display) is handled externally rather than within the sketch itself.
Then, in User_setup_Select.h, just uncomment one line to include the modified User_Setup.h
// Only ONE line below should be uncommented to define your setup. Add extra lines and files as needed.
#include <User_Setup.h> // Default setup is root library folder
And that’s it. Now you can run TFT_eSPI libraries sample, and it should work. Here’s an example rainbow screen:
Modified Code Sample from the Bodmer’s Library:
/*
An example showing rainbow colours on a 1.8" TFT LCD screen
and to show a basic example of font use.

Make sure all the display driver and pin connections are correct by
editing the User_Setup.h file in the TFT_eSPI library folder.

Note that yield() or delay(0) must be called in long duration for/while
loops to stop the ESP8266 watchdog triggering.

#########################################################################
###### DON'T FORGET TO UPDATE THE User_Setup.h FILE IN THE LIBRARY ######
#########################################################################
*/

#include // Graphics and font library for ST7735 driver chip
#include

TFT_eSPI tft = TFT_eSPI(); // Invoke library, pins defined in User_Setup.h

unsigned long targetTime = 0;
byte red = 31;
byte green = 0;
byte blue = 0;
byte state = 0;
unsigned int colour = red << 11;

void setup(void) {
tft.init();
tft.setRotation(1);
tft.fillScreen(TFT_BLACK);

targetTime = millis() + 1000;
}

void loop() {

if (targetTime < millis()) {
targetTime = millis() + 10000;

// Colour changing state machine
for (int i = 0; i < 160; i++) {
tft.drawFastVLine(i, 0, tft.height(), colour);
switch (state) {
case 0:
green += 2;
if (green == 64) {
green = 63;
state = 1;
}
break;
case 1:
red--;
if (red == 255) {
red = 0;
state = 2;
}
break;
case 2:
blue ++;
if (blue == 32) {
blue = 31;
state = 3;
}
break;
case 3:
green -= 2;
if (green == 255) {
green = 0;
state = 4;
}
break;
case 4:
red ++;
if (red == 32) {
red = 31;
state = 5;
}
break;
case 5:
blue --;
if (blue == 255) {
blue = 0;
state = 0;
}
break;
}
colour = red << 11 | green << 5 | blue;
}

// The standard ADAFruit font still works as before
tft.setTextColor(TFT_BLACK);
tft.setCursor (12, 5);
tft.print("Hello World!");

// The new larger fonts do not use the .setCursor call, coords are embedded
tft.setTextColor(TFT_BLACK, TFT_BLACK); // Do not plot the background colour

// Overlay the black text on top of the rainbow plot (the advantage of not drawing the background colour!)
tft.drawCentreString("by Berkeley Computer", 80, 14, 2); // Draw text centre at position 80, 12 using font 2

//tft.drawCentreString("Font size 2",81,12,2); // Draw text centre at position 80, 12 using font 2

tft.drawCentreString("Thapathali", 80, 30, 4); // Draw text centre at position 80, 24 using font 4

tft.drawCentreString("9/13/2024", 80, 54, 4); // Draw text centre at position 80, 24 using font 6

// Note the x position is the top left of the font!

// draw a floating point number
float pi = 3.14159; // Value to print
int precision = 3; // Number of digits after decimal point
int xpos = 50; // x position
int ypos = 110; // y position
int font = 2; // font number only 2,4,6,7 valid. Font 6 only contains characters [space] 0 1 2 3 4 5 6 7 8 9 0 : a p m
xpos += tft.drawFloat(pi, precision, xpos, ypos, font); // Draw rounded number and return new xpos delta for next print position
tft.drawString(" is pi", xpos, ypos, font); // Continue printing from new x position
}
}
Output:
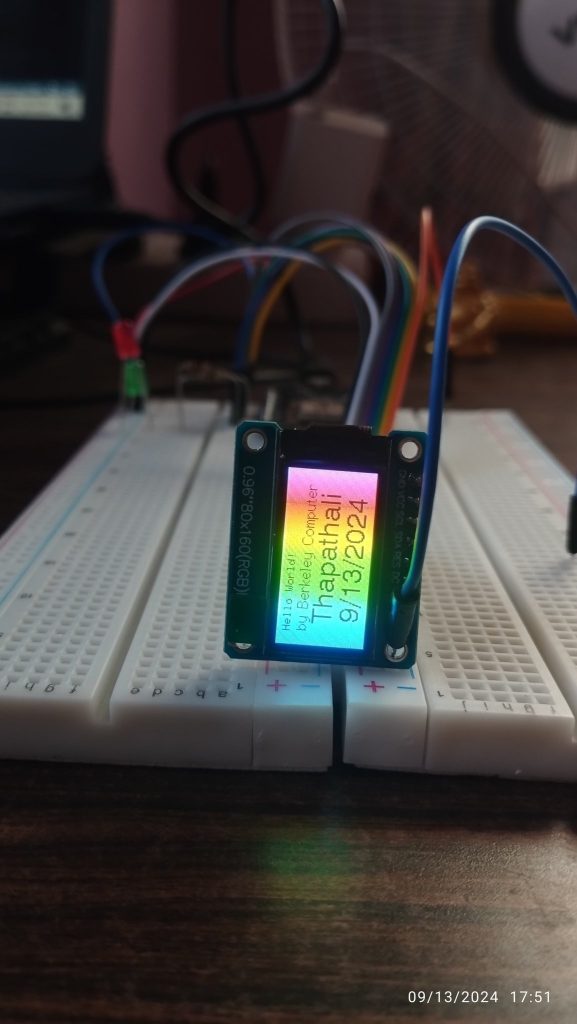
Have fun!
Copy & Share
Interfacing SPI ST7735S TFT LCD (0.96 inch 80×160 RGB) with NodeMCU v1.0
https://www.bhupalsapkota.com/st7735s/